Marking the column location

We wanted the column to come out at the same line as the center of the steering wheel, which is also where we put the wiper. That way, everything will be in line. The only people that will probably notice it are those who are watching this buildup, but it’ll still be ambiguously appealing.

Here is the ididit column we’re using. It’s a 28″ steel tilt unit, with a Lecarra Mark 9 steering wheel on there for now [edit, 10 years later: it’s still on there]. I’ve wrapped giant Saran wrap around it so that the oil from my hands doesn’t make it rust.

This is a tricky part. The firewall on the Bear body is about 2-1/2″ thick. In order to put the column through that behemoth firewall, the holes on either side need to be staggered vertically, and also they’re not round holes, they’re ellipses. We decided to use a 1-7/8″ hole saw to cut through, and then clean the rest out by hand. This should result in a very clean looking firewall – there won’t be the typical billet floor mount. Just a hole exactly the size as the column. If I’m good. Remember, we’re not installing an interior – what you see will be the finished product.
Column position is a crucial part of the comfort level of any build. If your column is in the wrong spot, it won’t tilt properly into position, and it won’t be in the optimal spot when you’re driving down the road. We established the position by sitting in the car, holding the column up at the bottom, and then marking the top of the output shaft on the tape. The left to right position was determined by dropping a plumb line from the wiper hole center, which is also the center of the steering wheel. It’s a bit tricky to get all this stuff lined up, so take your time. It will be worth it when you’re comfortable. Oh, and make sure you have THE SEAT THAT YOU’RE USING installed. NOT a milk crate, or a toilet, or whatever else you think might work.
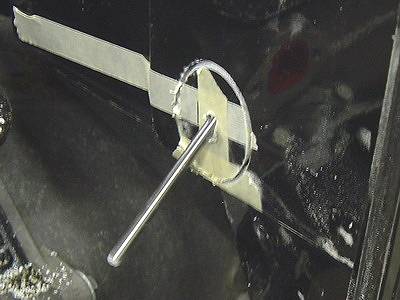
I drilled a very small hole on each side of the firewall, then used a welding rod to make sure I had the holes on the right angle going up to the steering wheel. Then I enlarged the hole to 1/4″. This allowed me to use a 1/4″ rod, with a flat ground on one end, as a sort of pilot guide in the place of the pilot drill of the hole saw. This will ensure I have the drill on the correct angle all the way through the firewall. I started from the engine side, and just broke through the outside surface of fiberglass. Doing this will protect the gel coat from chipping when I break through from the inside.

Here’s the other side.

Voila, the slug. We can use this inner panel to insert riv-nuts into to mount the A/C evaporator, gas pedal, etc. without bolts going through to the other side. It’s also a great heat and sound insulator.

A 2″ exhaust tube was used as a guide so I knew when I had sanded enough without hoisting the column into position every time I wanted to check the hole. It was tricky, because the hole isn’t square to the firewall, and the fiberglass is about 1/8″ thick.

I thought I was being really smart by cutting teeth into the end of the tube, to act as a 2″ hole saw. It didn’t really work too well. But this is what I came up with- looks pretty sharp, eh?

On to the column drop…
former owner Mikes Classic muscle cars in Du Quoin Ill; I live in Tn now build my own drag cars and show cars / I have seen your parts and i like what i see please send me a catalog.Ineed alot of parts/think you.vegamike.
Hi Mike, thanks for your comment. Please send your mailing address to info@welderseries.com and we’ll get a paper catalog right out to you. Otherwise, check out our parts in our online store.
Thanks
DW Horton